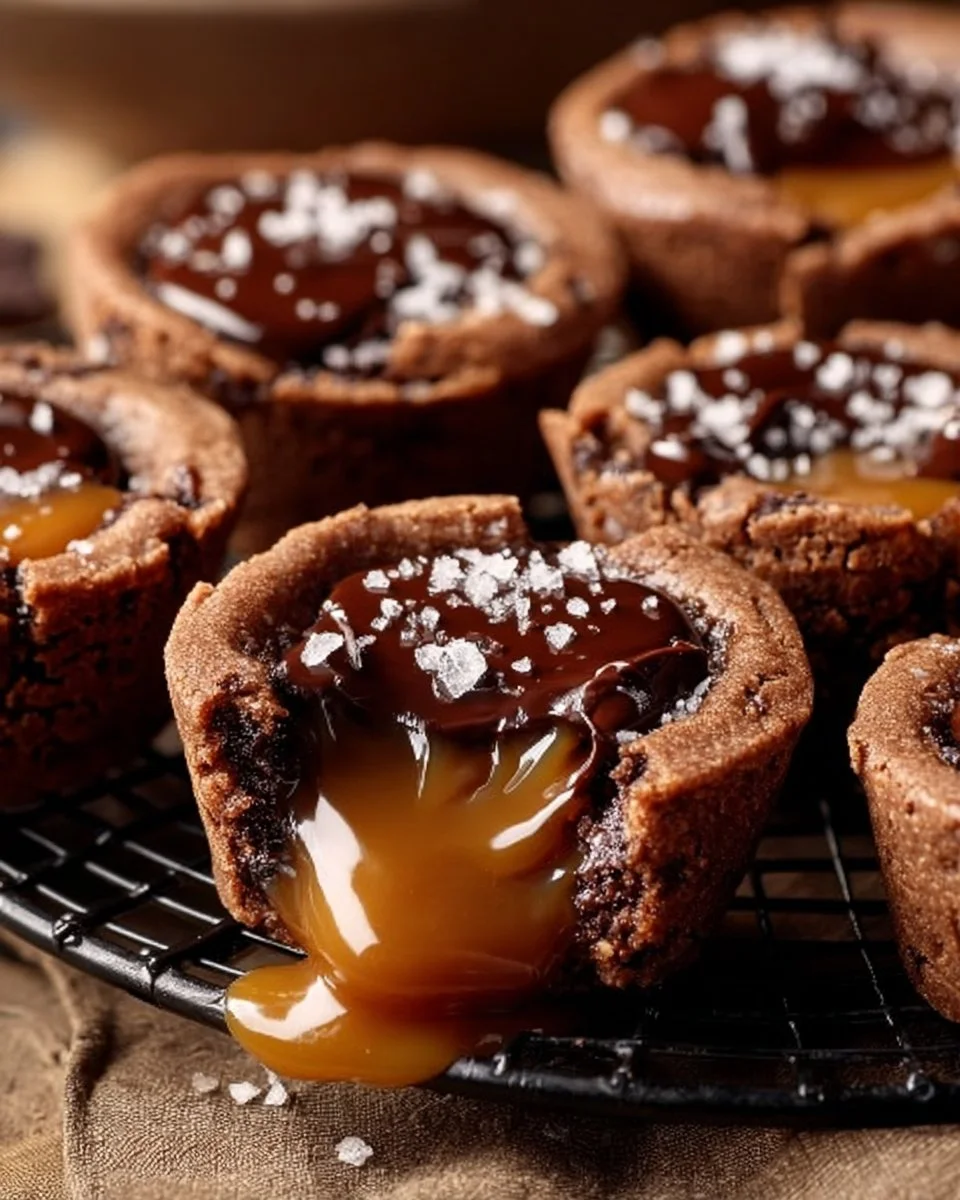
These Caramel Chocolate Cookie Cups are small, rich treats that blend sweet caramel, dark chocolate, and a soft sugar cookie shell. They smell warm and buttery as they bake. The first bite gives a crisp edge, a soft cookie center, sticky caramel, and a smooth chocolate top. People made filled cookies for years. The idea of a cookie cup that holds sauce or candy feels new, but it draws on old ideas like filled tarts and chocolate candies. This version keeps the cookie simple so the caramel and chocolate shine.
You will like how the caramel flows, how the chocolate breaks with a soft snap, and how a little sea salt lifts the whole taste. The oven makes the room smell like butter and sugar. Kids and adults both smile when they see a tray of these cups. They suit parties, gifts, or a calm night treat. They look fancy but they stay easy to make. If you like other filled cookies, try a related take on cookies that pair fruit and caramel for a fresh twist like these best double chocolate chip cookies. Use the cups as a quick wow dessert or a leave-behind for friends. Read on and you will find simple steps, clear cues, and smart tips that make these cookie cups fail-proof and fun. The sweet and salty mix makes each bite surprise you, and this mix fits many occasions from school bake sales to calm weekend treats. Try them soon.
Why make this recipe
- Easy and fast: Ready-to-use cookie dough and caramel bits cut prep time. You can finish a batch in about 30–40 minutes.
- Great crowd-pleaser: The mix of caramel and chocolate wins most tastes. Kids and adults usually ask for seconds.
- Beginner friendly: The steps are simple. Press dough, bake, fill, and top. No complex tools or skills required.
- Pantry-staple friendly: Most items are common in stores. You can keep extra dough or chips for quick baking.
- Flexible and cost-effective: You can use cheaper or premium chips and caramel. Make more or less without harm to taste.
- Looks special with low effort: The cups look like a bakery treat but need only a few steps.
- Perfect for gifts: They travel well and fit in small boxes for holiday or party gifts.
This version uses ready dough and caramel bits to save time and reduce the risk of overmixing. The method keeps the cookie shell thin and crisp at the edge, so the cup holds warm caramel without falling apart.
How to make Caramel Chocolate Cookie Cups
Start with good tools: a standard muffin tin, a small spoon, and a heat-safe bowl for chocolate. The logic is simple. We bake the cookie dough into a cup so it forms a shell. The shell must be firm enough to hold warm caramel but still soft inside. We warm the caramel bits with a little water to make a smooth pourable sauce. We melt the chocolate to create a thin seal and a shiny top. Finally, salt adds balance and wakes up the sweet flavors.
When you press the dough into the tin, you aim for even walls. If the dough clumps, the cup will bake unevenly. Press with gentle, even pressure from the center out to avoid tears. When you bake, the heat sets the rim first. You want a light golden edge but a slightly pale center; that center will finish as the cup cools and when you fill it. Heating the caramel slowly over low heat prevents it from burning or separating. A small amount of water helps the caramel soften and glide into the cups.
When you melt chocolate, use short bursts in the microwave or a low double boiler. Stir often. Overheating will make grainy chocolate. A smooth drizzle makes the cups look like a pro made them. If you need ideas that use caramel in cookie form with fruit, see a simple take on caramel apple cookies for related flavor ideas and plating tips.
Ingredients
- 280 g ready-to-use sugar cookie dough
- 310 g caramel bits
- 280 g semi-sweet or dark chocolate chips
- 2 tablespoons water
- 1 sprinkle sea salt flakes
Choose the best quality by reading labels. For cookie dough, pick a brand with real butter or make your own if you want control. For caramel bits, pick soft caramel chips or pieces that melt smooth. For chocolate, pick semi-sweet or dark with at least 50–60% cocoa for good flavor. Use sea salt flakes for a bright finish.
Substitutions:
- Dairy-free: Use dairy-free ready cookie dough, dairy-free caramel chips, and vegan chocolate chips. Add a bit more water if the caramel feels thick.
- Gluten-free: Use a gluten-free sugar cookie dough (pre-made or homemade with gluten-free flour).
- Lower sugar: Use dark chocolate with higher cocoa and look for reduced-sugar caramel alternatives, though texture may change slightly.
Directions
-
Preheat your oven to 350°F (175°C).
- Visual cue: The oven should reach temperature before you bake. If your oven has an oven light, you will see the interior glow warm. A stable 350°F gives even baking. Preheating takes 10–15 minutes on most ovens.
-
Grease a muffin tin.
- Visual cue: Light oil or butter on each cup will make cookie cups lift out cleanly. Use a paper towel to spread a thin, even film. The tin will look slightly shiny but not wet.
-
Press sugar cookie dough into the bottom and up the sides of each muffin cup.
- Visual cue: Use about a walnut-sized piece of dough per cup (adjust by tin size). Flatten the dough into a round disk, then push it up the sides with your thumb or a small spoon. The dough should reach the rim or just below it and look even in thickness.
-
Bake for 10–12 minutes until edges are golden.
- Visual cue: Watch the edges turn light golden brown. The center will still look slightly pale. You should hear a soft crackle as the edges set. Do not let the centers brown too much or the cups will be dry.
-
Remove from oven and let cool slightly.
- Visual cue: Let cups sit 5–7 minutes in the tin. The rims will firm and lift from the pan slightly. The centers will set but stay soft. If you try to remove them too hot, they may break.
-
In a saucepan over low heat, combine caramel bits and water until smooth.
- Visual cue: Place caramel bits and 2 tablespoons water over low heat. Stir constantly with a silicone spatula. The caramel will first look glossy, then melt into a smooth, thick sauce. Smell: warm, sweet, with a hint of butter. Avoid boiling — small bubbles mean too hot.
-
Spoon caramel into each cookie cup.
- Visual cue: Fill each cup about three-quarters full. The caramel will flow slowly. If caramel is too thick, add a teaspoon of warm water and stir. The filled cups should have a shiny dome of caramel.
-
Melt chocolate chips in the microwave or double boiler, then drizzle over the caramel.
- Visual cue: For microwave, heat 20 seconds, stir, repeat until smooth. For double boiler, stir constantly until shiny. Use a spoon to drizzle or a piping bag for neat lines. The chocolate should make a thin layer or design and remain glossy when set.
-
Sprinkle with sea salt flakes.
- Visual cue: Add a small pinch of sea salt on each cup while chocolate is still warm so it sticks. The flakes should look bright and add a small spark of contrast.
-
Let cool completely before serving.
- Visual cue: Allow cups to set at room temperature 30–60 minutes, or chill for 10–15 minutes to speed up. The caramel will settle but stay soft inside. The chocolate should firm and show a light sheen.
How to serve Caramel Chocolate Cookie Cups
- Party platter: Arrange cups on a white plate with a dusting of cocoa or powdered sugar around the edges. Add fresh raspberries for color and tartness.
- With coffee or tea: Serve with a strong coffee like espresso or a bold black tea. The bitter drink balances the sweet caramel.
- Dessert trio: Place one cup with a small scoop of vanilla ice cream and a drizzle of extra caramel for a composed dessert.
- Gift box: Stack in small paper cups inside a box. Add a note about keeping them cool.
For a pro look, pipe a thin chocolate spiral on top and place a single sea salt flake or a tiny nut piece in the center.
How to store Caramel Chocolate Cookie Cups
Short-term (fridge):
- Place cups in an airtight container in a single layer or with parchment between layers.
- Store up to 4–5 days. Keep chilled to prevent caramel from getting too soft in warm rooms.
Long-term (freezer):
- Freeze on a tray for 1–2 hours until firm, then transfer to a freezer bag or airtight container.
- Store up to 2 months. Thaw in the fridge overnight before serving.
Best reheating:
- For a warm cup, place on a plate and microwave 10–15 seconds. Check temperature and add 5–10 seconds if needed. Do not overheat or the cookie will go hard.
- For oven reheat, warm at 300°F (150°C) for 5–8 minutes. Cover loosely with foil if you fear the chocolate will brown.
- Tip: Warm slightly so caramel flows but chocolate remains intact.
Tips to make Caramel Chocolate Cookie Cups
- Use chilled dough: Cold dough holds shape better in the tin and makes cleaner cups.
- Press evenly: Thin, even walls bake uniformly and will not break when filled.
- Low heat for caramel: Keep heat low and stir to avoid scorching or grainy texture.
- Test one cup first: Bake and fill one cup to set timing and textures before making a full batch.
- Melt chocolate gently: Stir often and avoid steam in a double boiler to keep chocolate smooth.
- Don’t overfill: Leave room for chocolate on top so cups look neat.
- Salt at the end: Add sea salt after chocolate so flakes stay visible and crisp.
Variation
- The Deluxe Version: Use caramel made from heavy cream and butter, and finish with chopped toasted pecans. Use 70% dark chocolate for a rich top.
- Make it Spicy: Add 1/4 teaspoon ground chili or cayenne to the melted chocolate for a warm spice note that pairs with caramel.
- The Healthy Version: Use gluten-free dough, date caramel (blend dates with a touch of water), and dark chocolate with high cocoa; cups will be denser but still tasty.
- Fruit twist: Add a small spoonful of fruit jam under the caramel for a fruity center.
- Nutty crunch: Press a few chopped toasted hazelnuts into the chocolate before it sets.
FAQs
Q: Can I make these ahead of time?
A: Yes. Make up to 3 days ahead and keep covered in the fridge. For longer storage, freeze as described above.
Q: Why is my caramel too thin or runny?
A: You may have overheated it or added too much water. Cool it briefly to thicken, or add a small amount of extra caramel bits and warm gently.
Q: Why did my cookie cups crack when I removed them?
A: They may have been too hot or not greased enough. Let cups cool 5–10 minutes in the tin, then run a butter knife around the edge before removing.
Q: Can I use homemade cookie dough?
A: Yes. Use a dough that holds shape and is not too sticky. Chill it before pressing into the tin.
Q: How do I stop the chocolate from getting dull or streaky?
A: Melt slowly and avoid water contact. Stir often and use low heat. If chocolate looks dull, allow it to fully set at room temperature, not in a cold fridge which can cause bloom.
Q: Can I replace caramel bits with dulce de leche?
A: Yes. Warm dulce de leche gently until pourable, then spoon into cups. It may be thicker, so you might need to thin with a tiny splash of cream.
Q: My caramel hardened after cooling. How to fix?
A: Warm gently in a small pan or microwave in short bursts. Stir until smooth, then refill cups.
Conclusion
For more recipe ideas and a close variation on salted caramel and chocolate cookie cups, you can read this detailed take on filled cookie cups at Caramel Chocolate Chip Cookie Cups – Pastry & Beyond. If you want another home-style version with step-by-step photos, check this guide to a simple chocolate caramel cup at Chocolate Caramel Cookie Cups – Noshing With The Nolands.

Caramel Chocolate Cookie Cups
Ingredients
Method
- Preheat your oven to 350°F (175°C).
- Grease a muffin tin lightly with oil or butter.
- Press sugar cookie dough into the bottom and up the sides of each muffin cup.
- Bake for 10–12 minutes until the edges are golden.
- Remove from oven and let cool slightly for 5–7 minutes.
- In a saucepan over low heat, combine caramel bits and water until smooth.
- Spoon caramel into each cookie cup, filling about three-quarters full.
- Melt chocolate chips and drizzle over the caramel.
- Sprinkle with sea salt flakes while the chocolate is still warm.
- Let cool completely before serving.