homemade dinner rolls are one of those things I always think I do not have time for, right up until I smell them baking and remember why I keep coming back. If you have ever stared at a basket of sad store bought rolls that taste like air, you get it. These are the kind that pull apart in soft, steamy layers and make even a basic weeknight dinner feel a little special. I make them when we are having soup, holiday meals, or honestly just because I want a warm roll with butter. You do not need fancy tools, just a little patience and a cozy spot for the dough to rise.
Overview: How to Make Homemade Dinner Rolls
I know yeast can feel intimidating, but this is very doable. The basic idea is simple: make a soft dough, let it rise, shape it into balls, let it rise again, then bake until golden. I have made these homemade dinner rolls on busy Sundays and also on random Tuesdays, and both times they disappeared fast.
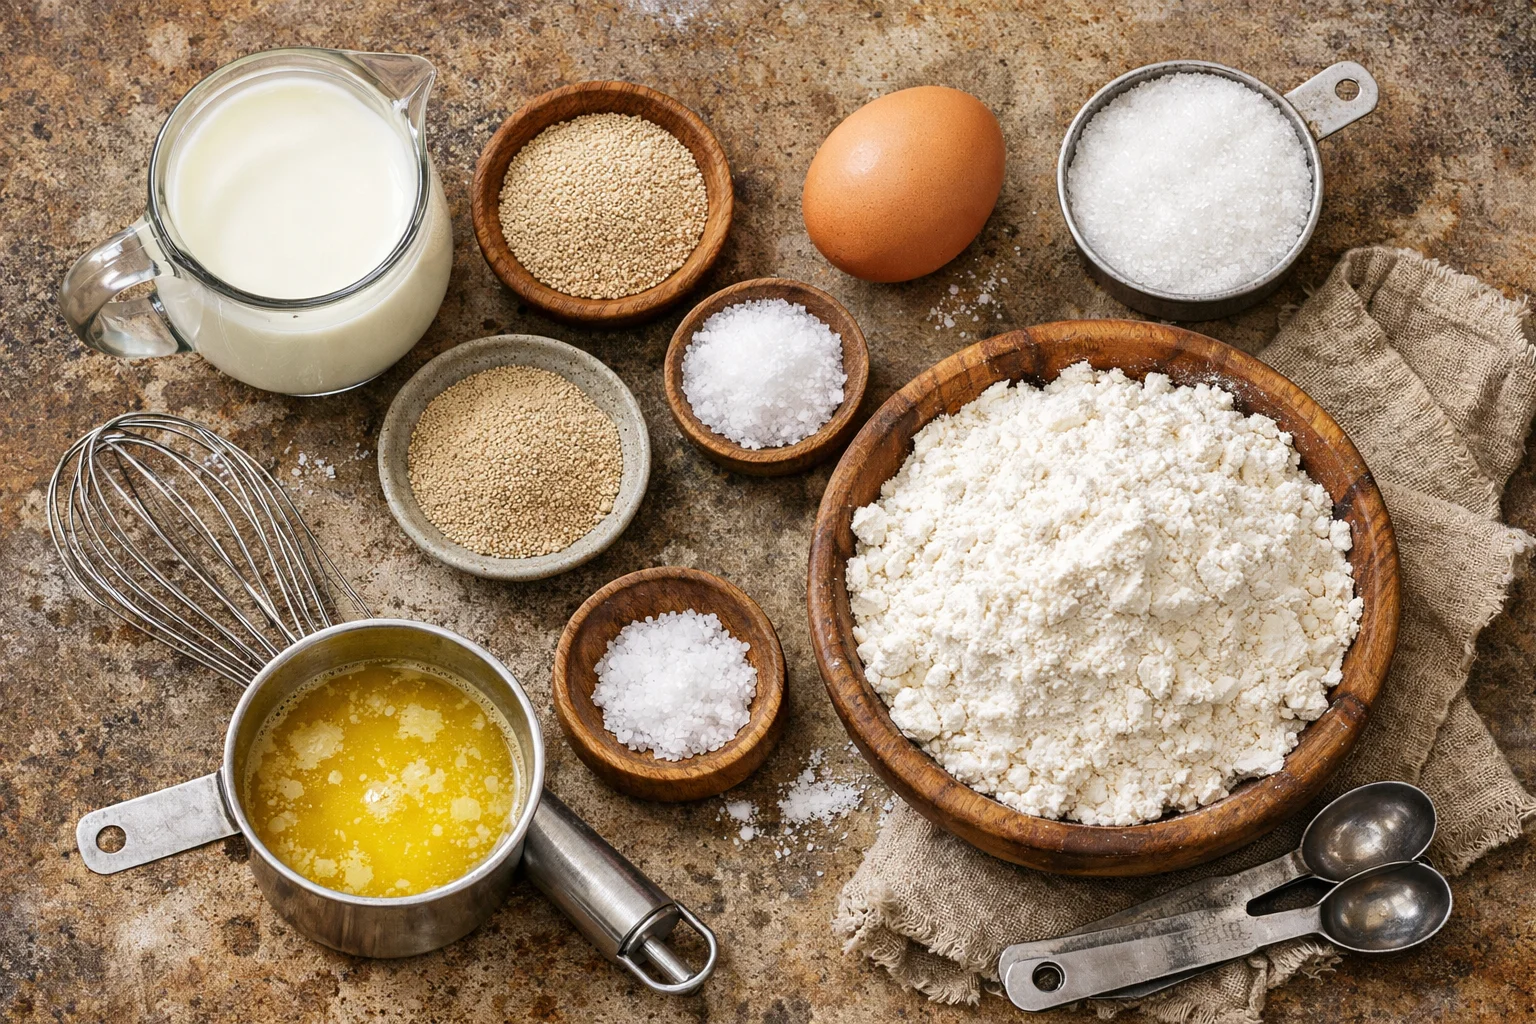
Here is what you will need. I am keeping it straightforward, because that is how I cook at home.
- Warm milk (not hot, just warm like bath water)
- Yeast (active dry or instant both work)
- Sugar (a little, to help the yeast wake up)
- Egg (for richness)
- Butter (melted, plus more for brushing)
- Salt
- Flour (all purpose is perfect)
Quick directions, the real life version:
Warm the milk, stir in sugar and yeast, then wait until it looks foamy. Mix in egg, melted butter, and salt. Add flour slowly until you get a soft dough that is a little tacky but not a sticky mess. Knead for a few minutes until it looks smooth. Cover and let rise until doubled. Shape, rise again, bake at 350 F until golden, then brush with butter.
If you want a dedicated, step by step version with extra photos, I also have a full post you can jump to here: my homemade dinner rolls guide. It is basically the same recipe, just more hand holding if you want it.
And because I promised a helpful little snapshot, here is the quick reference you can screenshot.
Once you get the feel for the dough, you will stop overthinking it. I pair these with lots of dinners from my easy dinner ideas page when I am planning the week.
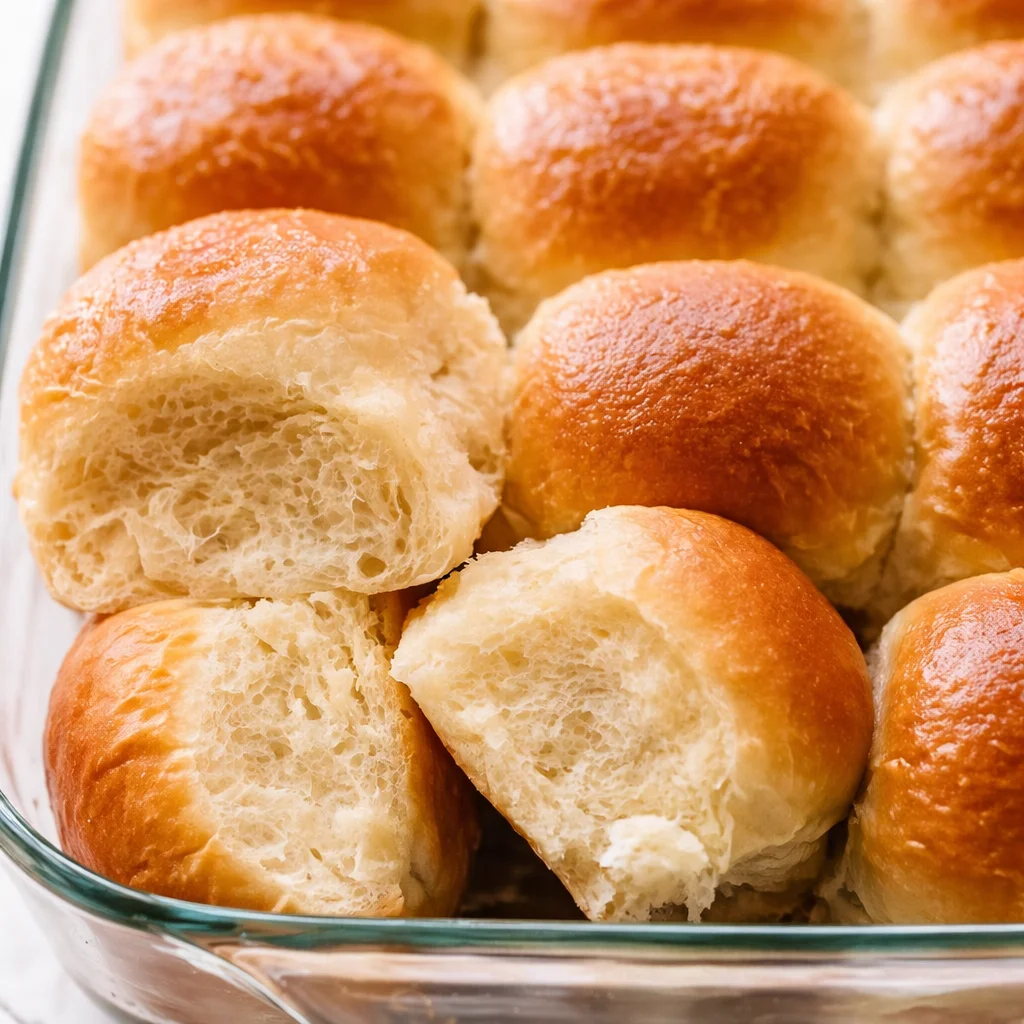
Soft Dinner Rolls Require a Rich Dough
Let us talk about what makes these rolls actually soft. It is not magic, it is the combo of fat, dairy, and not overloading the dough with flour. A rich dough has things like milk, butter, and egg. Those ingredients make the crumb tender and give you that bakery style pull apart feel.
My biggest lesson learned: do not keep dumping flour in just because the dough feels a little sticky at first. It is supposed to be soft. If you add too much flour, you will still get rolls, but they will lean more dry than fluffy. I stop adding flour when the dough is still slightly tacky but can be handled with lightly floured hands.
A few practical tips that help every single time:
Use warm milk, not hot. If it is too hot, it can mess with the yeast. If you can comfortably dip a finger in, you are good.
Give the dough enough time. Rising time depends on your kitchen. On a cold day, I sometimes stick the covered bowl in the oven with the light on.
Butter matters. Brush the tops right when they come out. That is when it soaks in and makes them extra delicious.
These homemade dinner rolls are also the perfect sidekick for saucy meals. If you ever make a cozy curry night, you will want something to mop up the sauce. I have been eyeing this homemade butter chicken ebook for exactly that reason.
How to Shape Dinner Rolls
Shaping sounds fussy, but I promise it is not. You are basically turning dough into little smooth balls so they bake up evenly and pretty. If mine look a bit rustic, I am fine with it. They still taste amazing, and nobody complains.
My easy shaping method
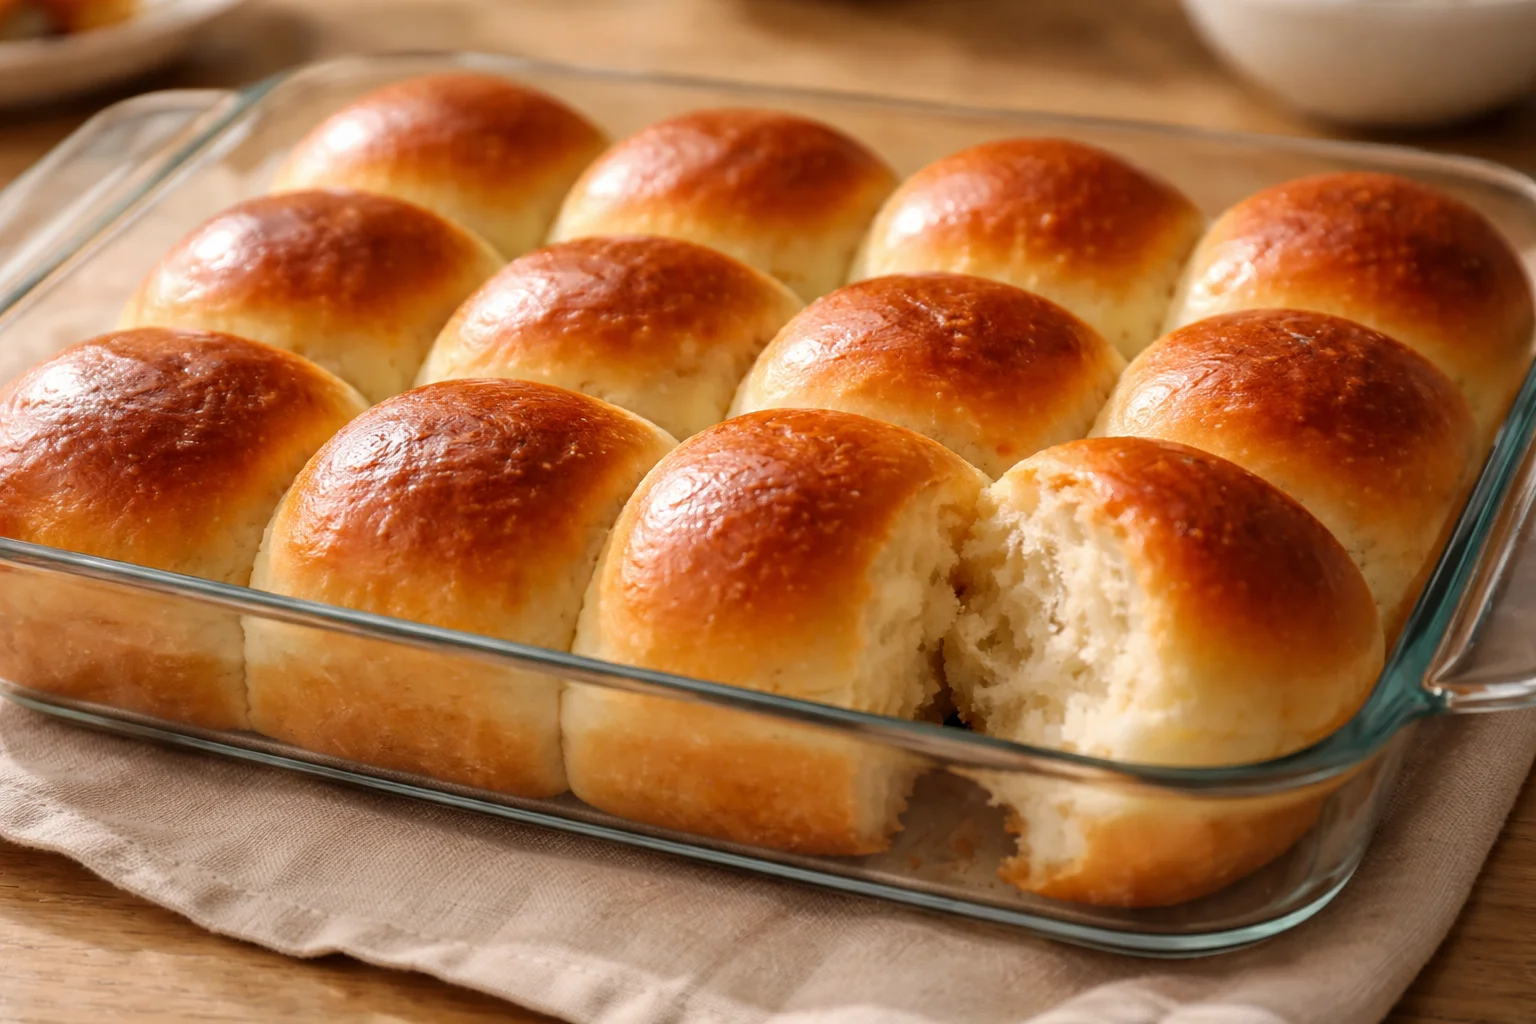
After the first rise, I gently press the dough down to release the air. Then I cut it into equal pieces. You can eyeball it, or use a kitchen scale if you want perfectly even rolls. For a 9 by 13 pan, I usually do 12 to 15 rolls depending on how big I want them.
To shape each one, I pull the edges toward the bottom, pinch lightly, then roll it on the counter under my palm. You will feel it tighten into a smooth ball. Place them in a buttered pan with a little space between. As they rise the second time, they will snuggle up together and that is what gives you those soft sides.
One more small thing that helps: do not over flour the counter. If the surface is too slippery with flour, the dough will not tighten into a ball as easily.
“I made these for Sunday dinner and my family literally fought over the last one. They were soft, buttery, and stayed fluffy even the next day.”
If you want something fun and veggie packed to serve with them, this sticky honey garlic cauliflower is surprisingly good with warm rolls on the side.
How to Make Yeast Rolls Ahead of Time
This part is a lifesaver if you are cooking for guests or a holiday. I love homemade dinner rolls, but I do not love doing everything at the last second. Good news, you can absolutely get ahead.
Option 1: Refrigerate after shaping
Make the dough, let it rise once, shape the rolls, and put them in the pan. Cover tightly and refrigerate overnight. The next day, pull them out and let them sit at room temp until puffy, usually 60 to 90 minutes depending on your kitchen. Then bake like normal.
Option 2: Freeze unbaked rolls
Shape the rolls and place them on a tray to freeze until firm, then transfer to a freezer bag. When you want to bake, put them in a pan, cover, and let them thaw and rise until puffy. It takes a few hours, so I do this on a slow afternoon at home.
Option 3: Bake and rewarm
If you truly want zero stress, bake them earlier in the day. Wrap tightly. Right before dinner, warm them in the oven for about 8 to 10 minutes. Brush with a little extra butter and they will feel fresh again.
Whatever method you choose, just keep an eye on the second rise. Yeast has a mind of its own, and timing changes with temperature.
3 Success Tips
I have made plenty of batches that were good, and a few that taught me what not to do. These three tips are the ones I would text a friend if they were making homemade dinner rolls for the first time.
- Do not kill the yeast. If your milk is steaming, it is too hot. Let it cool a bit before adding yeast.
- Stop adding flour early. A slightly tacky dough bakes into soft rolls. A stiff dough bakes into dense rolls.
- Bake just until golden. Overbaking dries them out fast. If they are lightly golden on top, check them.
One extra bonus tip: if you want extra shine, brush the tops with a little milk or egg wash before baking. If you want maximum cozy, brush with butter after baking and sprinkle a tiny pinch of flaky salt.
Common Questions
Why did my rolls turn out dense?
Usually it is too much flour or not enough rise time. Next time, keep the dough softer and let it get properly puffy before baking.
Can I use instant yeast instead of active dry?
Yes. Instant yeast can be mixed in without proofing, but I still like to mix it with warm milk just to be sure it is alive and happy.
How do I know when the dough has risen enough?
It should look doubled in size. If you gently poke it, the dent should slowly spring back but not disappear instantly.
What pan should I use?
A 9 by 13 baking dish is easiest. A cast iron skillet also makes beautiful rolls with slightly crisp edges.
How do I store leftovers?
Keep them in an airtight bag or container at room temp for up to 2 days. Warm for a few seconds in the microwave or a few minutes in the oven.
A warm pan of rolls is always worth it
If you have been on the fence about baking rolls, let this be your sign. homemade dinner rolls do not need to be perfect to be totally lovable, and once you taste that fresh butter soaked top, you will get why I make them again and again. For more roll inspiration, I have learned a lot from The BEST Dinner Rolls – Mom On Timeout and I also really like the helpful baking notes in Soft Dinner Rolls Recipe – Sally’s Baking Addiction. Make a batch this week, keep the butter nearby, and tell me if you manage to eat just one.

Homemade Dinner Rolls
Ingredients
Method
- Warm the milk and stir in the sugar and yeast. Wait until it looks foamy.
- Mix in the egg, melted butter, and salt.
- Gradually add flour until a soft, slightly tacky dough forms.
- Knead the dough for a few minutes until smooth.
- Cover the dough and let it rise until doubled in size.
- Gently press the dough down to release the air and cut into equal pieces.
- Shape each piece into a smooth ball and place them in a buttered pan with space in between.
- Cover and let them rise again until puffy.
- Preheat the oven to 350°F (175°C) and bake the rolls until golden.
- Immediately brush with more melted butter after removing from the oven.