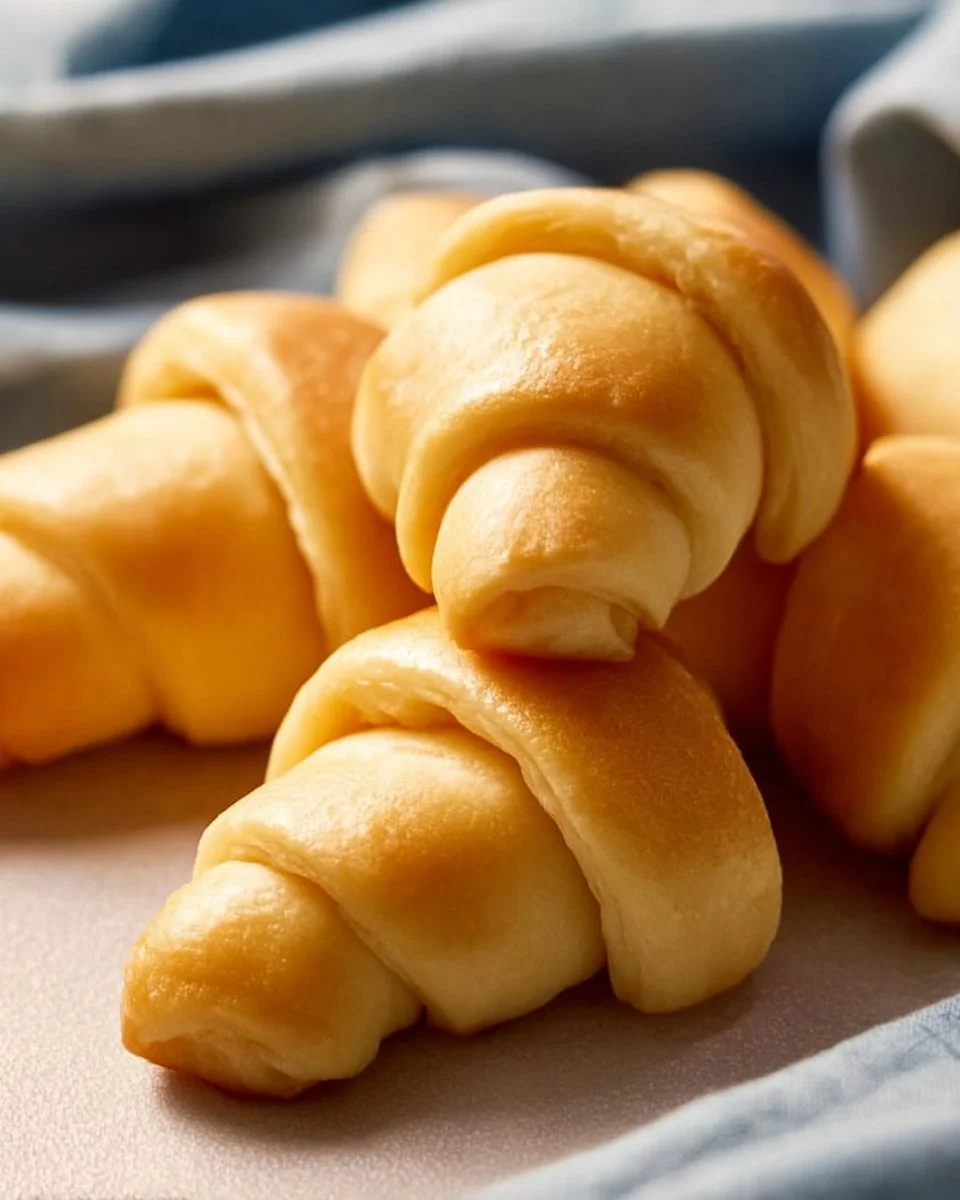
What Makes Crescent Rolls Special
Crescent Rolls are soft, buttery, and lightly sweet. They puff up with delicate layers and a golden edge. The aroma of warm butter and yeast fills the kitchen as they bake. People love them for the contrast of a tender crumb and a slightly crisp outer crust. These rolls are perfect with a smear of butter, jam, or alongside savory meals. They are a classic comfort food that feels both homey and a little luxurious.
The name comes from the crescent shape you get by rolling triangular dough from the wide end to the tip. That shape creates thin outer layers that bake into flakey edges while the inner dough stays pillowy. Crescent Rolls trace roots to European rolled pastries and enriched yeast breads, refined in many home kitchens. The flavor profile is mild but rich—mainly butter, a hint of sweetness, and the clean yeast tang that makes bread addictive.
This easy Crescent Rolls recipe gives you consistent results. It balances sugar and salt, uses melted butter for richness, and keeps the dough soft yet strong enough to hold shape. If you enjoy soft, rolled breads, you might also like a sweeter twist like these banana bread cinnamon rolls. Read on to learn how to make homemade Crescent Rolls that bake up fluffy, golden, and irresistible.
Why This Recipe is Perfect
- Quick and easy: Simple steps and minimal active time.
- Pantry-friendly: Uses common ingredients you likely have.
- Budget-friendly: Inexpensive ingredients deliver great flavor.
- Beginner-friendly: Clear directions make it ideal for first-timers.
- Family-approved: Soft texture appeals to kids and adults.
- Reliable rise: Yeast technique gives consistent doubling.
- Versatile: Works sweet or savory and pairs well with many meals.
This version stands out because it uses warm milk to gently activate yeast, melted butter to enrich flavor evenly, and one egg for structure—no complicated laminating or chilling. It’s a simple Crescent Rolls recipe that yields the soft crumb of homemade Crescent Rolls but with fewer steps than many online versions. This makes it one of the best Crescent Rolls recipes for busy cooks.
How to Make Crescent Rolls
Overview: You activate yeast, combine wet and dry ingredients, knead briefly, proof the dough, shape into triangles, roll into crescents, let rise, and bake. Each step has a clear purpose: activate yeast for lift, melt butter for richness, knead to develop gluten for structure, and proof to build flavor and volume.
Logic behind key steps:
- Dissolving yeast in warm milk wakes the yeast and tests viability. If frothy, the yeast is alive.
- Mixing melted butter with sugar and egg creates an enriched dough that stays tender.
- Adding flour gradually helps you stop when the dough becomes soft but not sticky.
- Kneading develops enough gluten to trap gas. You want elasticity, not a dense loaf.
- First rise builds flavor and lets the dough double. The second rise sets the shape and lightens the crumb.
For other rolled-dough ideas and shaping inspiration, check this savory take on rolls like cabbage rolls. Use the tips below while you make the dough to get the best texture and flavor.
Ingredients
- 2 1/4 teaspoons active dry yeast
- 1 cup warm milk (about 100–110°F / 38–43°C)
- 1/2 cup granulated sugar
- 1/3 cup butter, melted
- 1 teaspoon salt
- 3 cups all-purpose flour
- 1 large egg
How to choose high-quality ingredients:
- Yeast: Use fresh active dry yeast. Check the expiration date.
- Flour: All-purpose gives tenderness; sift if lumpy.
- Butter: Use real butter for flavor. Unsalted allows precise salt control.
- Egg: Large eggs add structure; room temperature eggs mix more evenly.
Substitutions:
- Dairy-free: Replace milk with unsweetened almond or oat milk and use dairy-free butter for a vegan-style roll (note: omit egg or use a flax egg for vegan, but texture will differ).
- Whole wheat: Substitute up to 1 cup whole-wheat flour for a nuttier, denser roll.
- Lower sugar: Reduce sugar to 1/4 cup for a less sweet roll; yeast activity remains adequate.
Step-by-Step Directions
-
Activate the yeast.
- Dissolve 2 1/4 teaspoons active dry yeast in 1 cup warm milk with a pinch of sugar.
- Visual cue: The liquid should look slightly cloudy at first, then form frothy bubbles on top within 5 minutes.
- Smell: A mild, yeasty, slightly sweet aroma signals active yeast.
- Mistake to avoid: If milk is too hot, it kills the yeast; if too cold, it won’t foam. Aim for warm, not hot.
-
Mix wet ingredients.
- In a large bowl, combine 1/3 cup melted butter, remaining sugar, and 1 teaspoon salt. Add 1 large egg.
- Visual cue: Mixture should look smooth and glossy after whisking.
- Mistake to avoid: Don’t pour hot butter directly onto the egg—let it cool slightly to avoid scrambling.
-
Combine yeast mixture with wet mix.
- Add the frothy yeast milk to the butter-sugar-egg mix and stir to combine.
- Visual cue: The batter thins and shines; you’ll see bubbles from the yeast spreading through.
-
Add flour gradually.
- Add 3 cups all-purpose flour a bit at a time, mixing until a soft dough forms.
- Visual cue: Dough pulls away from the sides of the bowl and holds shape.
- Mistake to avoid: Over-adding flour makes dense rolls. Stop when dough is soft and slightly tacky.
-
Knead the dough.
- Turn onto a floured surface and knead for 5–7 minutes until smooth and elastic.
- Visual cue: The dough becomes satiny and stretches without tearing.
- Sound: Minimal tearing noises; the dough should feel springy.
- Mistake to avoid: Under-kneading yields weak structure; over-kneading can make rolls tough.
-
First rise.
- Place dough in a greased bowl, cover, and let rise in a warm spot until doubled, about 1 hour.
- Visual cue: Dough should roughly double and feel pillowy when poked.
- Smell: A pleasant, fermenty aroma develops.
- Mistake to avoid: Rushing this step gives weak flavor and dense texture.
-
Shape crescents.
- Punch down dough, roll into a large circle, and cut into triangles.
- Visual cue: Triangles should be even; wide at base, pointy tip.
- Mistake to avoid: Triangles too small will overbake; too large may underbake.
-
Roll each triangle.
- Roll from the wide end toward the tip to form a crescent.
- Visual cue: You should see a tapered croissant-like shape.
- Mistake to avoid: If you roll too tightly, interior layers won’t expand.
-
Second rise.
- Place on a greased baking sheet, cover, and let rise 30 minutes.
- Visual cue: Rolls should puff and look slightly larger and airy.
- Mistake to avoid: Skip this and you’ll get a dense crumb.
-
Bake.
- Preheat oven to 375°F (190°C). Bake 12–15 minutes until golden brown.
- Visual cue: Tops should be evenly golden; bottoms lightly browned.
- Smell: A rich, buttery aroma signals doneness.
- Mistake to avoid: Overbaking dries rolls—remove when golden and soft.
Serve warm with butter or jam for the best texture and flavor.
How to Serve Crescent Rolls
- Classic breakfast: Warm rolls with butter and fruit jam. Pair with coffee or tea. Serve on a warm platter for a cozy table.
- Dinner side: Offer with roasted chicken, soup, or salads. Crescent Rolls soak up gravies and sauces nicely.
- Party slider base: Slice open and add ham, cheese, or roast beef for mini sliders—easy finger food for guests.
- Brunch board: Add fruit, cheeses, and sweet rolls; try pairing with cinnamon rolls like cinnamon rolls for variety.
Plating tip: Line a basket with a clean cloth to hold warm rolls and keep them soft. A small dish of whipped honey butter makes a pretty, shareable touch. 🥐
Storage and Reheating
Refrigerator: Store cooled rolls in an airtight container for up to 3 days. They stay soft but may dry slightly.
Freezer: Wrap cooled rolls tightly in plastic wrap and place in a freezer bag for up to 3 months. Freeze individually for easy reheating.
Best reheating:
- Oven: Preheat to 350°F (175°C). Place rolls on a baking sheet covered loosely with foil and warm 8–10 minutes from fridge, 12–15 minutes from frozen.
- Microwave: Wrap a roll in a damp paper towel and heat 10–20 seconds—quick but can make texture a bit chewy.
- Steam revive: Place rolls in a steamer basket over simmering water for 1–2 minutes to restore softness.
Reheat gently to keep layers tender and avoid drying.
Pro Tips
- Use room-temperature ingredients to mix evenly.
- Proof yeast in a warm, draft-free space. A slightly warm oven (turned off) works well.
- Brush with melted butter right after baking for shine and flavor.
- For flakier edges, roll a little tighter at the wide end, but not so tight you compress layers.
- Measure flour by scoop-and-level—too much flour makes dry dough.
- Add a light egg wash (1 egg beaten with 1 tbsp water) for deeper color.
- If your kitchen is cold, increase rise time rather than raise temperature; slow fermentation yields better flavor.
Variations
- Spicy version: Add 1/2 teaspoon garlic powder and 1/4 teaspoon cayenne to the dough. Brush with chili butter after baking.
- Healthy version: Replace 1 cup of all-purpose flour with whole-wheat pastry flour and swap half the butter for applesauce (texture will be softer).
- Vegetarian/vegan option: Use plant-based milk and butter. Replace the egg with a flax egg (1 tbsp ground flax + 3 tbsp water). Note: texture will be slightly different.
- Deluxe/gourmet upgrade: Fill each triangle with cream cheese and herb blend or add a thin layer of Nutella for a sweet treat. Finish with a light sugar dusting.
Frequently Asked Questions (FAQ)
Q: How do I prep ahead?
A: Make the dough up to the first rise, then punch down, wrap, and refrigerate overnight. The slow chill develops flavor. Next day, roll, shape, let rise 30–45 minutes, and bake.
Q: My yeast didn’t foam. What now?
A: If the yeast mix fails to foam, it is likely dead or the liquid was too hot or cold. Discard and start with fresh yeast. Always test new yeast before using.
Q: Can I use instant yeast instead?
A: Yes. Use 2 teaspoons instant yeast and mix directly into the flour. You may skip the initial proof, but proofing yields better flavor.
Q: My rolls are dense. Why?
A: Common causes: too much flour, under-kneading, rushed rise, or yeast problems. Weigh ingredients for accuracy and allow full rises.
Q: How long to bake for darker crust?
A: Bake up to 2–3 minutes longer, watching closely. For deeper color without drying, apply an egg wash before baking.
Q: Can I freeze unbaked rolls?
A: Yes. Shape rolls, freeze on a tray until firm, then transfer to a bag. Bake from frozen, adding a few extra minutes to the bake time.
Conclusion
Thanks for reading this simple Crescent Rolls guide — an easy Crescent Rolls and homemade Crescent Rolls approach that gives tender, buttery results. For more recipe inspiration and variations, see Immaculate Bites’ homemade Crescent Rolls and the classic technique at King Arthur Baking’s flaky buttery Crescent Rolls. If you try this best Crescent Rolls recipe, save it, share it, and enjoy warm rolls with friends and family.

Crescent Rolls
Ingredients
Method
- Dissolve the yeast in warm milk with a pinch of sugar until frothy.
- In a large bowl, combine melted butter, remaining sugar, and salt. Add the egg.
- Combine the frothy yeast mixture with the wet ingredients.
- Gradually add flour until a soft dough forms.
- Knead the dough on a floured surface for 5-7 minutes until smooth and elastic.
- Place the dough in a greased bowl, cover, and let rise in a warm spot until doubled, about 1 hour.
- Punch down the dough, roll it out, and cut it into triangles.
- Roll each triangle from the wide end towards the tip to form crescents.
- Place on a greased baking sheet, cover, and let rise for 30 minutes.
- Preheat the oven to 375°F (190°C). Bake for 12-15 minutes until golden brown.
- Serve warm with butter or jam.