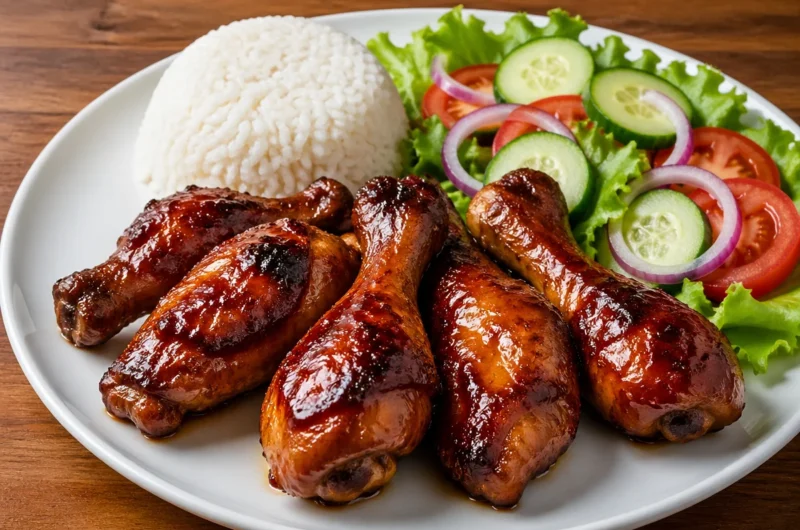
What Makes Sticky Honey Garlic Chicken Drumsticks with Rice & Fresh Salad Special
Sticky Honey Garlic Chicken Drumsticks with Rice & Fresh Salad draws inspiration from Asian cuisine, celebrated for its harmonious flavors. The chicken is succulent with a glossy, sweet glaze that captures garlic’s savory essence and honey’s rich sweetness. The aroma of caramelizing garlic fills the kitchen, making it impossible to resist. Home cooks love preparing this dish because it’s a delightful combination of juicy drumsticks and fluffy rice, freshened up by a crisp salad. Each bite bursts with flavor, leaving you eager for more!
Why This Recipe Works
- Quick prep time
- Uses pantry-friendly ingredients
- Budget-conscious
- Beginner-friendly
- Family-tested and approved
This specific version of Sticky Honey Garlic Chicken Drumsticks with Rice & Fresh Salad stands out because it strikes the ideal balance between sweetness and savory depth. The combination of honey, soy sauce, and garlic creates a unique sauce that clings beautifully to the chicken, ensuring every bite is packed with flavor. It’s an easy Sticky Honey Garlic Chicken Drumsticks with Rice & Fresh Salad that doesn’t require complicated techniques, making it perfect for any home cook.
How to Make Sticky Honey Garlic Chicken Drumsticks with Rice & Fresh Salad
To make Sticky Honey Garlic Chicken Drumsticks with Rice & Fresh Salad, start by seasoning the drumsticks with salt, pepper, and paprika. This step enhances the flavor before you add the sticky glaze. Then, mix honey, minced garlic, soy sauce, and ketchup to create a luscious sauce. The baking process at a high temperature allows the drumsticks to crisp up beautifully while absorbing the glaze. This is how to make Sticky Honey Garlic Chicken Drumsticks with Rice & Fresh Salad that are juicy and tender, served over rice with a fresh salad on the side.
Ingredients
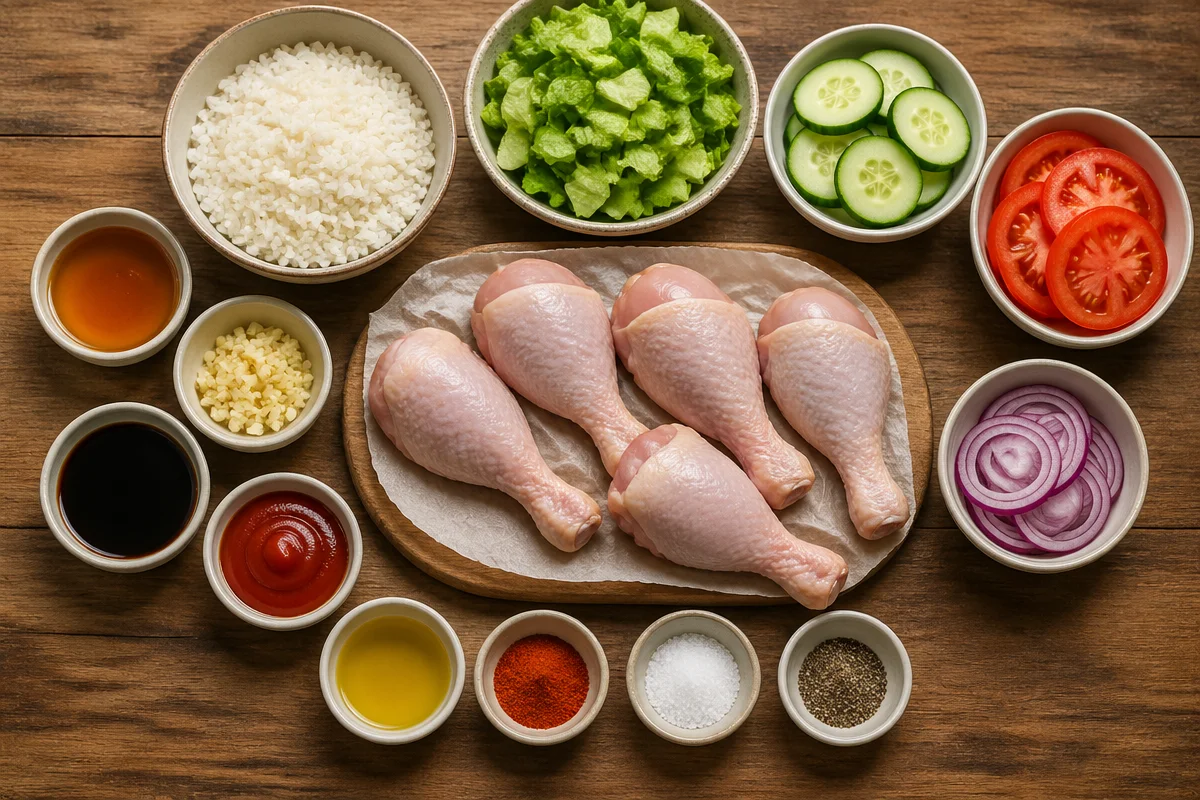
- 6 chicken drumsticks
- 2 tbsp honey
- 3 cloves garlic, minced
- 2 tbsp soy sauce
- 1 tbsp ketchup
- 1 tbsp olive oil
- 1 tsp paprika
- Salt & black pepper
- 2 cups cooked white rice
- 1 cup lettuce, chopped
- 1/2 cucumber, sliced
- 1 tomato, sliced
- 1/4 red onion, sliced
When choosing chicken drumsticks, look for plump, blemish-free meat with a fresh smell. Opt for local honey for an authentic sweetness. For a budget-friendly approach, chicken thighs work just as well. You can easily make this dish gluten-free by using tamari instead of soy sauce or create a vegetarian version by using plant-based proteins, like marinated tofu.
Step-by-Step Directions
-
Prepare the Chicken: Preheat your oven to 400°F (200°C). Season the chicken drumsticks with salt, pepper, paprika, and olive oil. The chicken should glisten with olive oil, which ensures moisture during baking. Avoid skimping on seasoning for the best flavor.
-
Make the Sauce: In a medium bowl, combine honey, minced garlic, soy sauce, and ketchup. Stir until well mixed and fragrant. This glossy sauce should be thick and sticky; if it’s too thin, the chicken won’t get that perfect caramelized coating.
-
Bake the Drumsticks: Place the seasoned drumsticks on a baking sheet lined with parchment paper. Bake for 35–40 minutes. Halfway through cooking, brush the drumsticks generously with the sauce. As they bake, they’ll turn a deep, golden brown; this caramelization enhances texture and flavor. Don’t skip this step, or the glaze won’t stick properly.
-
Fluff the Rice and Prepare the Salad: While the chicken bakes, fluff your cooked white rice with a fork. In a bowl, toss together the chopped lettuce, sliced cucumber, tomato, and onion. This fresh salad adds a colorful crunch to the meal. Make sure to use crisp vegetables to keep that freshness intact.
-
Serve: Once the chicken is cooked through, and the internal temperature reaches 165°F (75°C), serve the baked drumsticks over a bed of rice. Plate the fresh salad on the side for a beautiful and balanced meal. The contrast of textures will leave everyone hungry for seconds!
How to Serve Sticky Honey Garlic Chicken Drumsticks with Rice & Fresh Salad
For a fantastic dining experience, pair your chicken drumsticks with steamed broccoli or snap peas to add crunch and color. A chilled glass of iced tea complements the sweetness of the honey glaze perfectly. To create an inviting presentation, arrange the chicken drumsticks neatly over the rice, scatter salad greens around the plate, and garnish with sesame seeds. This dish is ideal for a weeknight dinner or a casual weekend gathering.
Storage and Reheating
You can store Sticky Honey Garlic Chicken Drumsticks with Rice & Fresh Salad in the fridge for up to 4 days in an airtight container. For longer storage, freeze the cooked chicken for up to 3 months. To thaw, leave it in the refrigerator overnight. When reheating, place the chicken in the oven at 350°F (175°C) for about 15-20 minutes to regain its original texture. For meal prep, consider packaging the salad ingredients separately to keep them fresh until serving.
Pro Tips
-
Chef-Level Flavor Technique: Marinate the chicken in the sauce for a few hours or overnight. This allows the flavors to penetrate deeper, making each bite even more delicious.
-
Texture Improvement Trick: Pat the drumsticks dry with paper towels before seasoning. This helps achieve a nice crispy skin during baking, preventing steaming.
-
Common Mistake and Fix: Many overlook the importance of brushing the sauce halfway through the cooking process. This step is vital for that signature sticky glaze.
-
Ingredient Upgrade: Use high-quality honey for a richer flavor. Local, raw honey often has a more complex taste than processed versions.
-
Time-Saving Shortcut: Prep the salad while the chicken is baking. This way, everything is ready at the same time, making for a quick and easy dinner.
Variations
Spicy Version
Add crushed red pepper flakes or a dash of sriracha to the sauce to give your chicken a spicy kick. This adds heat that beautifully complements the sweetness of the honey.
Lighter and Healthier Version
Use skinless chicken drumsticks or thighs for a lower-fat option. Serve over quinoa instead of rice to boost the nutritional value while keeping the flavors intact.
Vegetarian or Vegan Version
Replace the chicken with marinated tofu or tempeh. Coat them in the sticky sauce and bake until crispy. This substitution keeps the essence of the dish while catering to plant-based diets.
Frequently Asked Questions
Q: Can I make this dish ahead of time?
A: Absolutely! You can marinate the chicken and prepare the sauce a day in advance, storing everything separately in the fridge. Just bake the chicken when you’re ready to serve.
Q: How do I fix a texture or consistency problem with the glaze?
A: If your glaze is too runny, simmer it over low heat for a few minutes to thicken it up. This will help the glaze stick to the chicken better.
Q: What’s the best ingredient substitution?
A: To make this dish gluten-free, use tamari instead of soy sauce. It’s a tasty alternative that keeps the flavor profile intact.
Q: How long does this dish keep?
A: The chicken can be stored in the fridge for up to 4 days. Freeze leftovers for up to 3 months for longer storage.
Q: How can I adjust the cooking time for a larger or smaller batch?
A: For larger batches, space the drumsticks out on the baking sheet to ensure even cooking. Small batches may cook faster, so check for doneness a few minutes early.
Q: Do I need to use drumsticks for this recipe?
A: While drumsticks work great, you can also use chicken thighs or even breasts. Adjust cooking times based on the cut of meat you choose.
Conclusion
Making Sticky Honey Garlic Chicken Drumsticks with Rice & Fresh Salad brings joy to the kitchen and satisfaction to the table. The combination of sweet and savory flavors creates a delightful dish that friends and family will adore. For more delicious variations, check out the Honey Garlic Chicken Thighs Recipe – Simple Home Edit or try the Sticky Honey Soy Chicken Drumsticks – My Korean Kitchen. Don’t forget to save this recipe for your next meal prep!

Sticky Honey Garlic Chicken Drumsticks with Rice & Fresh Salad
Ingredients
Method
- Preheat your oven to 400°F (200°C).
- Season the chicken drumsticks with salt, pepper, paprika, and olive oil.
- In a medium bowl, combine honey, minced garlic, soy sauce, and ketchup. Stir until well mixed.
- Place the seasoned drumsticks on a baking sheet lined with parchment paper.
- Bake for 35–40 minutes, brushing with sauce halfway through.
- Fluff your cooked rice with a fork. In a bowl, toss together the chopped lettuce, sliced cucumber, tomato, and onion.
- Once the chicken is cooked through and the internal temperature reaches 165°F (75°C), serve the baked drumsticks over rice and with the fresh salad on the side.